
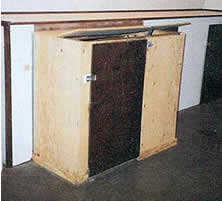
Add a Whelping Box to Your Indoor
Doghouse
|
|||||||||||||||||||||||||||||||
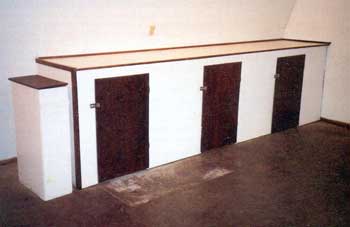
 The original doghouse floor area
is approximately four feet wide and four feet long. This floor area
is not large enough for raising a litter of pups.
A small
floor area could lead to trouble with mother hurting the pups by laying
on them. So let’s add an inside addition to the doghouse. Our first step is to remove
the inside door, wall panels, insulation and doghouse floor and expand the floor
area in additional two feet. After removing the inside wall a 2” thick
x 4’ wide x 6’ long piece of high density polystyrene is placed directly
on the floor. Cover the insulation with _” smooth-surfaced plywood. Rough
cut plywood should not be used because it can cause skin irritation during the
first few weeks of puppy growth due to the rough sharp wood surface.
The original doghouse floor area
is approximately four feet wide and four feet long. This floor area
is not large enough for raising a litter of pups.
A small
floor area could lead to trouble with mother hurting the pups by laying
on them. So let’s add an inside addition to the doghouse. Our first step is to remove
the inside door, wall panels, insulation and doghouse floor and expand the floor
area in additional two feet. After removing the inside wall a 2” thick
x 4’ wide x 6’ long piece of high density polystyrene is placed directly
on the floor. Cover the insulation with _” smooth-surfaced plywood. Rough
cut plywood should not be used because it can cause skin irritation during the
first few weeks of puppy growth due to the rough sharp wood surface.
|
|
|
|
|
|
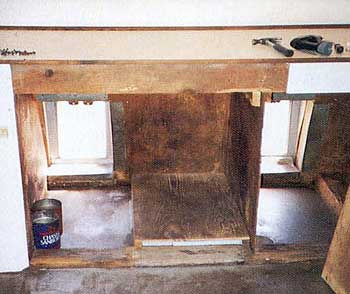
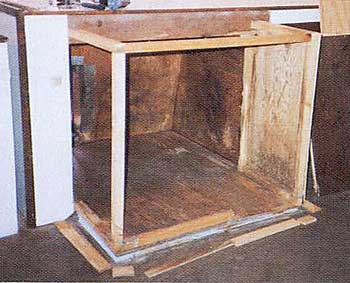
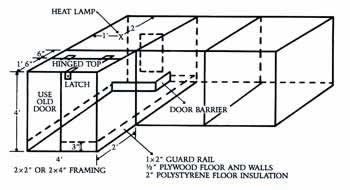
After covering the walls with 1/2” plywood, it’s important to install a floor railing. The railing will help protect against loss of pups due to being laid on by mother during the first few weeks of growth. I use a 1” x 2” pine installed three inches off the floor. A 1” spacer is inserted behind the railing at 2’ intervals to bring it away from the wall. The railing should be screwed in place with 2 1/2” sheetrock screws because you can remove it after two to three weeks of pup growth, allowing mother and pups additional space.
|
|
| Framing 2 x 2’s or 2 x 4’s |
28’ |
| Floor/walls 1/2” plywood |
2.5-4 x 8” sheets |
| Floor insulation 2” polystyrene |
1-4 x 8” sheet |
| Door (use existing door) |
|
| Guardrail 1 x 2” pine |
16’ |
| Sheetrock screws 1 1/2” and 2 1/2” |
50 |
| 3” hasp latch | 1 |
| 2” hinges | 2 |
| X- heat lamp location (red bulb) | |
|
|
| Table saw or circular saw Drill-screwdriver bit Hammer |
|
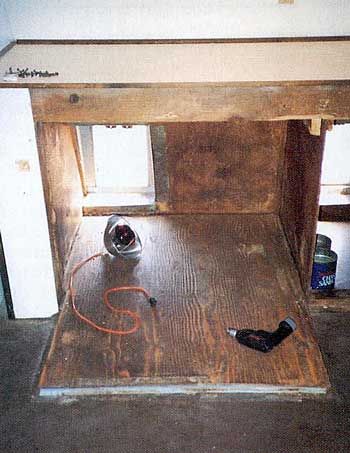
The ceiling for the addition can be made with 1/2” plywood. Be sure to insulate the ceiling if you construct your addition in an uninsulated building. Note in the photos how I cut the plywood ceiling in half and install a hinged ceiling with a locking hasp latch. I find this feature is important for me because when the pups are first born I can view them without disturbing mom. As the pups get older, I use the top access door to feed them. This way I don’t get mauled by the pups in the morning when I’m on my way to work.
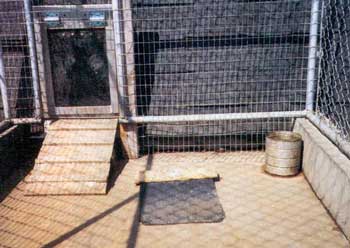
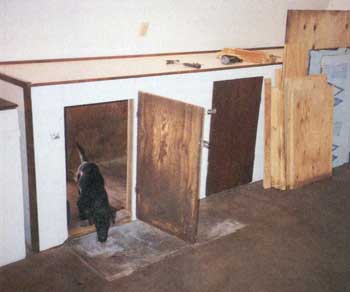
Use the original indoor doghouse door for your inside access. You are going to want this door because you will be cleaning the whelping box almost daily when the pups get five weeks and older. I always have a good door on the outside. For the first four weeks of pup growth a heavy duty plexiglass door allows for a draft free whelping box. It is important to construct a 1” x 5” high barrier in front of the outside access door. This allows only mother to go outside. Naturally young pups should not be allowed outside during this growth period. As the pups develop eyesight and mobility a light swinging truck mud flap is installed so the pups have outside access without door restriction or potential injury problems caused by the heavy door. Because the outside door is 10 inches off the kennel floor, a small ramp is installed. The 1/2” x 12” wide plywood ramp has four 1/2” x 1” x 12” steps and a 2” x 4” underneath it for added strength. I always screw the ramp to my building, otherwise the pups use it as a toy.
One more item should be installed and that’s a heating system. There are heat pads with thermostat controls available on the market. I like the use of a heat lamp with an insulated bulb socket that has a metal cage lamp protector. You can now buy lamps with red bulbs which eliminate direct bright problems caused by clear bulbs. I install the lamp approximately two feet in front of the outside door, directing the lamp to the center of the floor. Always monitor floor temperature. A timer can be used to turn of the heat lamp if you expect daytime temperatures to rise.
The construction details I have shown you are held together with various sizes of sheetrock screws so that your whelping box can be easily taken apart and available for reuse. This design will allow you to provide a safe environment for your puppies and simplify your cleaning and feeding chores.
TIPS
Videos and Articles on Kennel Design and Dog Training.
INSTALL
Pet Door Installation Instructions
with Training Tips.
BLOG
News, Features and More! Come Visit.


Thank You, Lance & Marcie
|
|
1-800-789-0203 • 701-354-7700 • Fax
701-354-0117
13835 34th St NW • Bismarck, ND 58503 International 701-354-7700 Copyright © 1992-2024 Gun Dog House Door® Inc. |